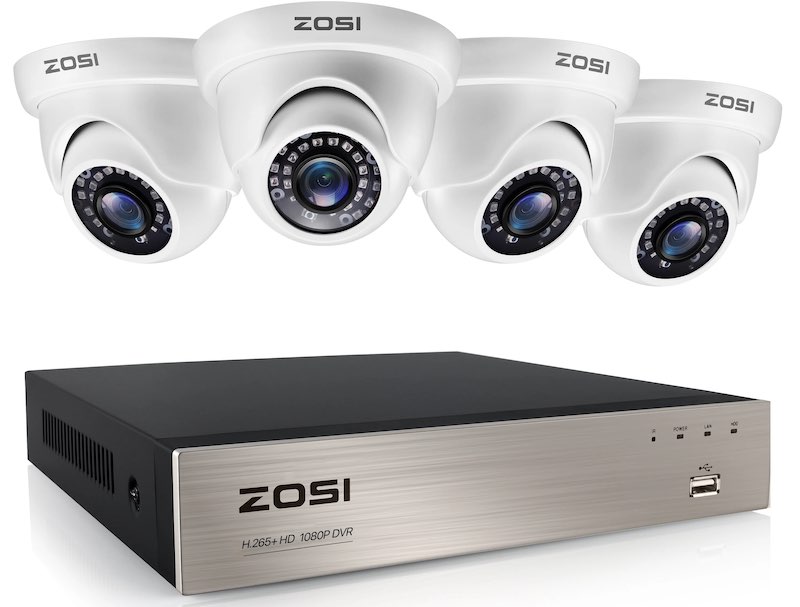
Zosi cameras are an excellent choice for home or business surveillance, offering a range of features and capabilities. While they do come with issues, you won’t have to worry about them thanks to this handy troubleshooting guide.
Here, we have provided a step-by-step guide on how to troubleshoot and fix the most common problems with the Zosi camera.
Zosi Camera Troubleshooting Guide: Common Problems & Fixes

Zosi Camera Not Working
- Check the Power Supply: Ensure that your Zosi camera is correctly connected to a power source and that the outlet is working correctly. If you’re using a battery-powered camera, try replacing the batteries.
- Check the Network Connection: Make sure that your camera is correctly connected to your Wi-Fi network. You can do this by checking the network status in the camera’s settings or by trying to access the camera via the Zosi app on your smartphone.
- Check the Camera Settings: Verify that the camera settings are correct and that the camera is not in sleep or standby mode. You can adjust these settings in the camera’s settings or through the Zosi app.
- Reset the Camera: If none of the above solutions work, try resetting your camera to its default settings. You can do this by pressing and holding the reset button on the camera for 10-15 seconds until the camera beeps or the indicator light flashes.
Zosi Camera Not Detecting Motion
- Check Motion Detection Settings: Verify that the motion detection settings are enabled in the camera’s settings or the Zosi app. Make sure that the motion detection zone is correctly configured to cover the area you want to monitor.
- Adjust Camera Placement: Check that your camera is correctly placed to detect motion. Ensure that there are no obstructions or objects blocking the camera’s view, and that the camera is positioned at the correct angle.
- Check Environmental Factors: Environmental factors such as lighting conditions, shadows, or weather conditions can affect motion detection. Ensure that the camera’s lens is clean, and there is sufficient lighting to detect motion.
- Reset the Camera: If the above solutions don’t work, try resetting your camera to its default settings, as mentioned above.
Zosi Camera Not Recording
- Check Storage Space: Ensure that your camera has sufficient storage space available to record video. If the camera is using an SD card or other storage device, check that the storage device is correctly inserted and functioning correctly.
- Check Camera Settings: Verify that the camera settings are correct and that the recording mode is enabled. You can adjust these settings in the camera’s settings or through the Zosi app.
- Check Network Connection: Ensure that your camera is correctly connected to your Wi-Fi network and that your network connection is stable. A weak or unstable network connection can prevent your camera from recording video.
- Reset the Camera: If none of the above solutions work, try resetting your camera to its default settings, as mentioned above.
Zosi Camera Not Showing Picture/Video
There are several reasons why your Zosi camera might not be showing any picture or video, including:
- Camera not powered on: Ensure that your camera is powered on and properly connected to a power source.
- Faulty cables: If the camera cables are damaged or not connected properly, the camera may not show any picture or video. Check to ensure that all cables are connected securely and are not damaged.
- Camera settings: It’s possible that the camera settings may have been changed, resulting in no picture or video. Reset the camera to its default settings and check if the issue has been resolved.
- Network issues: If the camera is connected to a network, network issues such as poor signal strength or slow internet speeds may cause the camera to not show any picture or video. Check your network connection to ensure it’s working correctly.
Fixes
- Check the power source and make sure it’s working correctly. Try plugging the camera into a different power source or using a different power adapter.
- Check the camera cables and connections. Replace any damaged cables or connectors.
- Reset the camera to its default settings. Refer to the camera manual for instructions on how to reset the camera.
- Check your network connection. Move the camera closer to the router or try using a network booster to improve the signal strength.
Zosi Camera Not Connecting
Cause 1: Incorrect Network Settings
If your camera is not connected to the same network as your device, you won’t be able to access it. To fix this, follow these steps:
- Check if your camera and device are connected to the same network.
- Make sure your camera’s IP address matches the network’s IP address range.
- Check if your router is blocking the camera’s IP address. If so, add the camera’s IP address to your router’s whitelist.
Cause 2: Weak Wi-Fi Signal
Another possible cause of Zosi camera connection problems is a weak Wi-Fi signal. If the Wi-Fi signal in the area where you’ve installed the camera is weak, you may not be able to connect to it. Here’s what you can do:
- Check the signal strength of your Wi-Fi network in the area where you’ve installed the camera. If it’s weak, move the camera closer to the router.
- Check if there are any obstructions or interference in the way of the Wi-Fi signal. Walls, metal objects, and other electronic devices can weaken the signal. Move the camera to a location with fewer obstructions.
Cause 3: Camera Firmware Issues
Sometimes Zosi camera connection problems can be caused by outdated or corrupted firmware. In such cases, updating the firmware may help. Here’s how you can do it:
- Download the latest firmware from the Zosi website.
- Connect the camera to your computer using an Ethernet cable.
- Open the camera’s web interface and log in.
- Navigate to the firmware upgrade section and select the firmware file you downloaded.
- Click “Upgrade” and wait for the process to complete.
Cause 4: Power Supply Issues
If your Zosi camera is not connecting, it could be due to power supply issues. Here’s what you can do:
- Check if the power supply is properly connected to the camera.
- Check if the power outlet is working properly.
- Check if the power cable is damaged. If it is, replace it with a new one.
Best Zosi Camera Settings for Best Output
Zosi cameras come with a wide range of settings that you can adjust to get the best possible output. Here are some general recommendations that can help you get the most out of your Zosi camera:
- Resolution: Set your camera to the highest possible resolution for the best image quality. Zosi cameras typically support resolutions of up to 1080p or 4K.
- Frame rate: Set your camera to a frame rate of at least 30 frames per second (fps) to get smooth video playback.
- Exposure: Adjust the exposure settings of your camera to match the lighting conditions in your environment. If you are shooting in low light conditions, increase the exposure time or use a higher ISO value.
- White balance: Make sure your camera’s white balance is set correctly to ensure accurate colors. You can set the white balance manually or use the auto white balance setting.
- Focus: Ensure that your camera is in focus by adjusting the focus ring or using the auto-focus feature.
- Bitrate: Set the bitrate of your camera to a high value to get the best possible video quality. Higher bitrates will result in larger file sizes, so make sure you have enough storage space.
- Compression: Choose the right compression algorithm to ensure that your camera’s output is optimized for your storage capacity and network bandwidth. H.264 is a common compression format that is widely supported.
By adjusting these settings, you should be able to get the best possible output from your Zosi camera. It’s worth experimenting with different settings to find the combination that works best for your particular use case.
How to Connect Zosi Camera to WiFi
Connecting your Zosi camera to your WiFi network is an essential step to start accessing your camera footage from your smartphone or computer. Here are the step-by-step instructions to connect your Zosi camera to WiFi:
Step 1: Download the Zosi Smart App
The first thing you need to do is download the Zosi Smart app on your smartphone from either the App Store (for iOS devices) or Google Play Store (for Android devices).
Step 2: Power Up the Zosi Camera
Connect the power adapter to your Zosi camera and plug it into an electrical outlet.
Step 3: Connect Your Phone to WiFi
Ensure that your smartphone is connected to the same WiFi network that you want your camera to be connected to.
Step 4: Add the Camera in the Zosi Smart App
Open the Zosi Smart app on your smartphone and click on the “Add Device” button. Then, select “Wireless Camera” and follow the on-screen instructions to add your Zosi camera to the app.
Step 5: Connect the Zosi Camera to WiFi
Once your camera has been added, click on it to access its settings. Then, click on “WiFi Config” and enter your WiFi network name and password. Your camera will now connect to your WiFi network.
Step 6: Verify the Connection
Once the camera has successfully connected to your WiFi network, it will show a green status light in the app. You can now access your camera footage from your smartphone or computer.
Zosi Camera Reset: Step-by-Step Guide
If you’re experiencing issues with your Zosi camera, resetting it to its default settings can help resolve the issue. Here’s how you can reset your Zosi camera:
Step 1: Locate the Reset Button
The reset button is usually located on the back of the camera or at the bottom of the camera’s stand.
Step 2: Press and Hold the Reset Button
Using a pin or paperclip, press and hold the reset button for at least 10 seconds until the status light starts flashing.
Step 3: Release the Reset Button
Once the status light stops flashing, release the reset button.
Step 4: Wait for the Camera to Restart
The camera will now restart and return to its default settings.
Step 5: Reconnect the Camera
After the camera has restarted, you will need to reconnect it to your WiFi network and the Zosi Smart app.
Zosi Camera System Setup Guide
Setting up your Zosi camera system involves a few steps, including mounting the cameras and connecting them to the DVR. Here’s how you can set up your Zosi camera system:
Step 1: Unbox and Mount the Cameras
Unbox your Zosi camera system and mount the cameras in the desired locations. Ensure that the cameras are mounted securely and have a clear view of the area you want to monitor.
Step 2: Connect the Cameras to the DVR
Use the provided cables to connect each camera to the DVR. The cables will be labeled with the camera number, so ensure that you connect them to the corresponding channel on the DVR.
Step 3: Connect the DVR to a Monitor
Connect the DVR to a monitor using the provided HDMI or VGA cable. Ensure that the monitor is turned on and set to the correct input.
Step 4: Power Up the System
Connect the power adapter to the DVR and plug it into an electrical outlet. Then, turn on the DVR by pressing the power button on the front panel.
Step 5: Access the DVR Menu
Once the DVR is powered up, you should see the Zosi logo on your monitor. Press the menu button on the remote control to access the DVR menu.
Step 6: Set Up the System
Use the DVR menu to set up your Zosi camera system. You can adjust the camera settings, configure recording options, and set up remote access to your camera footage.
Step 7: Access Camera Footage
Once you have set up your Zosi camera system, you can access the camera footage from your smartphone or computer using the Zosi Smart app or the Zosi View app.


