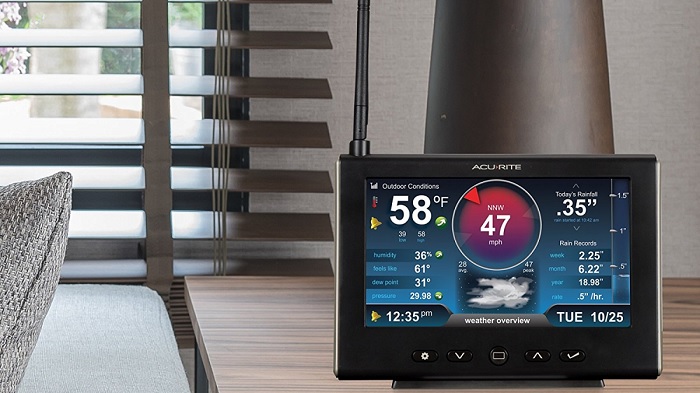
Installing a, AcuRite home weather station is a straightforward process, and with the help of the accompanying installation kits, you can set it up in just a few minutes in many cases.
The key is to position your outdoor weather station sensors high up in the air to accurately measure the weather conditions, especially for the wind sensors like the anemometer. Safety should be a priority when doing this.
If you’re in a hurry to set up your AcuRite weather station and don’t want to read through a lot of information, keep this crucial point in mind: a well-placed, inexpensive home weather station will outperform a poorly placed station regardless of its price.
To ensure the accuracy of your AcuRite weather station, placement is critical. Start by conducting a site survey of your property and look for the best possible location to expose your weather equipment to the elements.
AcuRite Weather Station Mounting Options and Considerations
Before we delve into the ideal weather station locations, let’s explore some actual installation examples to give you an idea of what’s possible.
- Roof Mounting: One option is to install your weather station on a tripod, either on the roof or on the ground. Note that Acurite weather stations use a 1″ mast, while Ambient and Davis use a 1.25″ mast.
- Eave Mounting: If your house has a gable roof, mounting the weather station on the eave using brackets is a straightforward choice.
- Satellite Mount: You may also use a satellite mount if available.
- Wall Mount: Consider installing the weather station on the side of your house using wall mounts.
- Fence Post: Mount the weather station on a fence post or an existing strong fence if possible.
- Stand-Alone Pole: Opt for a stand-alone pole or post installation if you have enough space and flexibility.
With these mounting options in mind, let’s explore the common choices for weather station placement:
Roof or Garage: Mounting on the roof or garage is the most common choice for many people, offering easy access and visibility.
Chimney: You can also mount the weather equipment on your chimney using suitable brackets.
Eaves: Brackets are available to securely mount a mast to the eaves of your house.
Ground: There are various ways to mount the weather station on the ground if it suits your situation.
Having multiple mounting choices is beneficial, but there are some considerations that might help narrow down your options.
Let’s now focus on finding the right location for your weather station installation.
AcuRite Weather Station Accessories: Mounting Considerations
Each weather station sensor requires an ideal location for accurate readings, but what suits one sensor might not be suitable for another.
Wind Sensors: The anemometer (wind speed sensor) and wind direction sensor should be installed on the roof of your house or garage to minimize obstructions and turbulence. Elevation is crucial for accurate wind measurements.
Thermometer: Place the thermometer in a location free from heat sources like A/C units, water heaters, gas heaters, fireplaces, and dryer vents. Avoid areas exposed to direct sunlight, such as roads, driveways, roofs, and concrete walls, as they can affect temperature readings. Be cautious of shadows that might impede solar-powered fans.
Hygrometer: To get accurate humidity and dew point readings, avoid placing the hygrometer near irrigated lawns, pools, or other sources of evaporation that can skew the data.
Rain Gauge: Install the rain gauge in an open area to capture rainfall from all directions. Ensure it is elevated to prevent splashing or interference from sprinklers. Watch out for wind-driven water from trees or shrubs and ensure the gauge remains level to avoid measurement errors.
Maintenance: Keep in mind that your weather station will require periodic maintenance, such as battery replacements and cleaning out debris like leaves, dust, or bird droppings.
Transmit Range: Consider the transmit range of the outdoor weather sensor, which typically ranges from 300′ to 330′, with some high-end stations reaching up to 1000′. For optimal performance, ensure the indoor receiver and outdoor transmitter are relatively close, with a clear line of sight between them. Signal strength meters on the indoor display can assist in placement decisions.
Lastly, some weather stations offer cabled versions, but wireless ones are more common. While cabled versions may pose a lower lightning risk, it’s advisable to avoid weather that lacks thunder and lightning, as it may indicate your area is too dull for a weather enthusiast.
Narrowing Down Your Choices and Considering Compromises
Identifying the most critical factors for your weather station installation has likely narrowed down your choices. Now, let’s explore some possibilities and potential compromises to find the best fit for your needs.
Temperature vs. Wind Measurements: Decide which data is more crucial for you. If temperature accuracy is a priority, and roof mounting seems suitable, consider placing the weather station on the side of the house that faces the prevailing winds in the summer. This way, the sensors are sheltered from the hot roof and receive more accurate wind readings.
Tweaking Temperature Data: If you notice temperature readings are inaccurate, some home weather stations offer the option to adjust the displayed values. To do this, compare the weather station readings with those from a reliable mercury thermometer placed in an ideal location. Record the readings throughout the day and night, then adjust the reported values on the weather station accordingly.
Davis Instruments Solution: Davis Instruments offers models with a detachable anemometer/wind vane assembly connected by a long cable, providing more flexibility in sensor placement. Their wireless units also have a longer transmit range of 1000 feet, reducing the need for compromises. However, these advanced features come at a higher price.
By carefully considering these factors and available options, you can find the best approach that suits your needs, weather conditions, and budget. Additionally, if you share your weather data with an online network, the weather community will appreciate your efforts and contributions.
Now, let’s explore practical mounting options for your weather station, especially for roof installations:
Chimney Mounting: If you’re not using your fireplace, your chimney provides a stable base to mount the weather station. Use installation kits designed for this purpose, securing the weather sensor several feet above the chimney.
Eaves Mounting: Mounting on the eaves of your house involves drilling holes for lag bolts, but they are easy to fix if you decide to remove the installation later. Kits are available for gable roofs, and you can use a 1.25-inch top rail pipe as a sturdy mount.
Dish Mounting: You can repurpose a satellite dish mount for your weather station. It offers flexibility in placement, regardless of the roofline direction. Heavy-duty versions with reinforcing brackets are available to address side-to-side movement.
By selecting the appropriate mounting solution and using the right tools, you can safely install your weather station for accurate and reliable measurements.
Acurite Weather Station Mounting: Choosing the Right Mount
To install your weather station, you’ll need a suitable mast that fits snugly inside the mounting pipe or can be clamped to the outside. Keep in mind that there is no standard size for these mounts, so a trip to the hardware store might be necessary.
Here are some mounting solutions and considerations for your weather station:
Roof Vent Pipe: Ensure the vent pipe is sturdy and well-supported. You can slip a bigger pipe over the vent and mount on the side, clamp a mast directly on the side of the vent, use a vent pipe installation kit, or attach a satellite dish mount to the vent.
Roof Tripod: For flat roofs, you can use a tripod with a flat frame at the bottom, weighted with bricks or sandbags. If your roof is pitched, TV antenna and weather station mounting tripods are available. Use tar pads to prevent leaks.
Side of the House: Several options are available, including using installation kits or satellite mounts attached to the wall. Ensure vertical installation for accurate readings.
Ground Mounting: If you have enough space, consider ground mounting your weather station away from obstructions like trees, roads, and buildings. Use a sturdy pole or post dug deep enough below the frost line and ensure it remains vertical. Concrete may be optional.
Ground Tripod: Ground-placed tripods are fast and easy to set up. Level a piece of ground, place the tripod, add weights, and extend the mast as needed.
When installing your weather station, consider the worst expected weather conditions in your area. While some stations have withstood hurricanes, make sure your installation is rock solid and follows safety guidelines.
Keep in mind that official weather station installation guidelines recommend specific distances from roads, driveways, trees, and height requirements for each sensor. Adhering to these guidelines can improve the accuracy and reliability of your weather station.


